Getting started
For those looking for the YAML configuration, here’s the repository: https://github.com/kdwils/homelab/tree/main/apps/bluesky.
Bluesky documentation (I’m assuming you already found this): https://github.com/bluesky-social/pds?tab=readme-ov-file#self-hosting-pds
Bluesky is another flavor of twitter/x (jack dorsey twitter v2), and allows you to self host a decentralized server that allows manage your social media data independently. Naturally, as someone who self hosts and occasionally tweets, this seemed like a cool thing to run on my kubernetes homelab.
I decided to write this post to help others looking to self-host in a similar environment
Kubernetes Caveats
The Docker image officially supplied by Bluesky doesn’t ship with the pdsadmin CLI, which makes the GitHub tutorial a little more awkward to follow if you’re planning to host on Kubernetes.
We can get around this by making rpc calls to the self hosted server.
Manifest
There are a few resources we need to create to host the server. I use Kustomize and a raw manifest approach.
Service and (optionally) a service account.. pretty standard so far. The server is exposed on port 3000 in the container.
apiVersion: v1
kind: ServiceAccount
metadata:
  name: bluesky
---
apiVersion: v1
kind: Service
metadata:
  name: bluesky
spec:
  type: ClusterIP
  ports:
    - port: 3000
      targetPort: pds-port
      protocol: TCP
      name: pds-port
  selector:
    app.kubernetes.io/name: bluesky
The deployment has the meat of the manifest
apiVersion: apps/v1
kind: Deployment
metadata:
  name: bluesky
spec:
  strategy:
    type: Recreate
  replicas: 1
  selector:
    matchLabels:
      app.kubernetes.io/name: bluesky
  template:
    metadata:
      labels:
        app.kubernetes.io/name: bluesky
    spec:
      serviceAccountName: bluesky # optional
      securityContext: {}
      containers:
        - name: bluesky
          securityContext: {}
          image: bluesky
          imagePullPolicy: IfNotPresent
          env:
            - name: PDS_HOSTNAME
              value: bluesky.kyledev.co
            - name: PDS_JWT_SECRET
              valueFrom:
                secretKeyRef:
                  name: "bluesky"
                  key: jwtSecret
            - name: PDS_ADMIN_PASSWORD
              valueFrom:
                secretKeyRef:
                  name: "bluesky"
                  key: adminPassword
            - name: PDS_PLC_ROTATION_KEY_K256_PRIVATE_KEY_HEX
              valueFrom:
                secretKeyRef:
                  name: "bluesky"
                  key: plcRotationKey
            - name: PDS_EMAIL_SMTP_URL
              valueFrom:
                secretKeyRef:
                  name: "bluesky"
                  key: smtpServer
            - name: PDS_EMAIL_FROM_ADDRESS
              valueFrom:
                secretKeyRef:
                  name: "bluesky"
                  key: smtpFromAddress
            - name: PDS_DATA_DIRECTORY
              value: "/pds"
            - name: PDS_BLOBSTORE_DISK_LOCATION
              value: "/pds/blocks"
            - name: PDS_DID_PLC_URL
              value: "https://plc.directory"
            - name: PDS_BSKY_APP_VIEW_URL
              value: "https://api.bsky.app"
            - name: PDS_BSKY_APP_VIEW_DID
              value: "did:web:api.bsky.app"
            - name: PDS_REPORT_SERVICE_URL
              value: "https://mod.bsky.app"
            - name: PDS_REPORT_SERVICE_DID
              value: "did:plc:ar7c4by46qjdydhdevvrndac"
            - name: PDS_CRAWLERS
              value: "https://bsky.network"
            - name: LOG_ENABLED
              value: "true"
          ports:
            - name: pds-port
              containerPort: 3000
              protocol: TCP
          volumeMounts:
            - name: data
              mountPath: /pds
          livenessProbe:
            httpGet:
              path: /xrpc/_health
              port: pds-port
          resources:
            limits:
              cpu: 300m
              memory: 512Mi
            requests:
              cpu: 100m
              memory: 128Mi
      volumes:
        - name: data
          persistentVolumeClaim:
            claimName: "bluesky"
Environment variables on the container
Turn logging on in the container:
- name: LOG_ENABLED
  value: "true"
Defaults provided in the installion script:
- name: PDS_DATA_DIRECTORY
  value: "/pds"
- name: PDS_BLOBSTORE_DISK_LOCATION
  value: "/pds/blocks"
- name: PDS_DID_PLC_URL
  value: "https://plc.directory"
- name: PDS_BSKY_APP_VIEW_URL
  value: "https://api.bsky.app"
- name: PDS_BSKY_APP_VIEW_DID
  value: "did:web:api.bsky.app"
- name: PDS_REPORT_SERVICE_URL
  value: "https://mod.bsky.app"
- name: PDS_REPORT_SERVICE_DID
  value: "did:plc:ar7c4by46qjdydhdevvrndac"
- name: PDS_CRAWLERS
  value: "https://bsky.network"
The hostname of the server that is public-facing on the internet:
- name: PDS_HOSTNAME
  value: bluesky.kyledev.co
Generating secret values
The others are tied to secrets because they container sensitive data.
The PDS_JWT_SECRET and PDS_ADMIN_PASSWORD can be generated by taking a look at the installation script and running the same command.
Hold onto your admin password for later.
You’ll need to run this for twice, once for the PDS_JWT_SECRET, and once again for the PDS_ADMIN_PASSWORD
openssl rand --hex 16
- name: PDS_JWT_SECRET
  valueFrom:
    secretKeyRef:
      name: "bluesky"
      key: jwtSecret

- name: PDS_ADMIN_PASSWORD
  valueFrom:
    secretKeyRef:
      name: "bluesky"
      key: adminPassword
The key for rotation can be generated using the following command from the installation script.
openssl ecparam --name secp256k1 --genkey --noout --outform DER | tail --bytes=+8 | head --bytes=32 | xxd --plain --cols 32
- name: PDS_PLC_ROTATION_KEY_K256_PRIVATE_KEY_HEX
  valueFrom:
    secretKeyRef:
      name: "bluesky"
      key: plcRotationKey
The SMTP server
For account verification, the PDS server needs to send emails. I used my Google account to handle this.
Here is a reference to start with: https://support.google.com/accounts/answer/185833?hl=en
Look for Create and manage your app passwords. Create an app password, and copy the code. It should look something like:
abcd efgh ijkl mnop
Creating the secret
These values can be encoded on unix systems with the following command
echo -n '<value-here>' | base64
For example, this command should output bXktdmFsdWU=
echo -n 'my-value' | base64
The secret to be created should look like the following:
apiVersion: v1
data:
  adminPassword: <base64 encoded value>
  jwtSecret: <base64 encoded value>
  plcRotationKey: <base64 encoded value>
  smtpFromAddress: <base64 encoded value>
  smtpServer: <base64 encoded value>
kind: Secret
metadata:
  name: bluesky
  namespace: bluesky
type: Opaque
Do NOT check this into source code management. I used bitnami’s sealed-secrets operator.
With this, you encrypt the secret locally, check the CRD into git, and then the CRD is decrypted in the cluster by the operator to create a normal secret resource.
Data persistence
You need somewhere for blue sky to store data and the sqlite file it uses for a database. I use longhorn.
I gave the PVC a starting storage of 20Gi. I’m not sure if this is overkill, or underkill.
kind: PersistentVolumeClaim
apiVersion: v1
metadata:
  name: "bluesky"
spec:
  accessModes:
    - ReadWriteOnce
  resources:
    requests:
      storage: 20Gi
Using the server
Once deployed and running in kuberentes, we can start the account sign up process, but we first need to expose our server to the world. Do this at your own risk. I prefer to use cloudflare tunnels.
Exposing our PDS server
I use Cloudflare tunnels to expose services outside of my Kubernetes cluster. To learn how to do the same, check out my previous post.
Add the ingress config for the PDS server. Here is an example of the format my cloudflared deployment config uses.
ingress:
  - hostname: bluesky.kyledev.co
    service: http://bluesky.bluesky.svc.cluster.local:3000
Add the DNS record using the cloudflared CLI.
cloudflared tunnel route dns <your-tunnel-name> <your-bluesky-host>
One problem with using cloudflared tunnels is verifying your email address. I ran into issues mentioned in these github issues and was running on version https://github.com/bluesky-social/pds/issues/100 https://github.com/bluesky-social/pds/issues/106
I ended up exposing the PDS server through my tailnet and making the RPC call to send the verification email that way. I copy pasted the http request from my browser and used the my tailnet domain instead.. hacky but it worked. The comments in these issues suggested editing the DB itself which I did not want to do. I was also using image version 2024.11.0.
Generating an invite code
curl -X POST 'https://<your-bluesky-host>/xrpc/com.atproto.server.requestEmailConfirmation' \
  --header 'Content-Type: application/json' \
  --data-raw '{"useCount": 1}' \
  --user 'admin:<your-admin-token>'
This should spit out a code like bluesky-<host>-<tld>-xxxxx-xxxxx. Sign up for a bluesky account using your domain and invite code. You can do this via phone app or web app.
Verifying our domain and handle
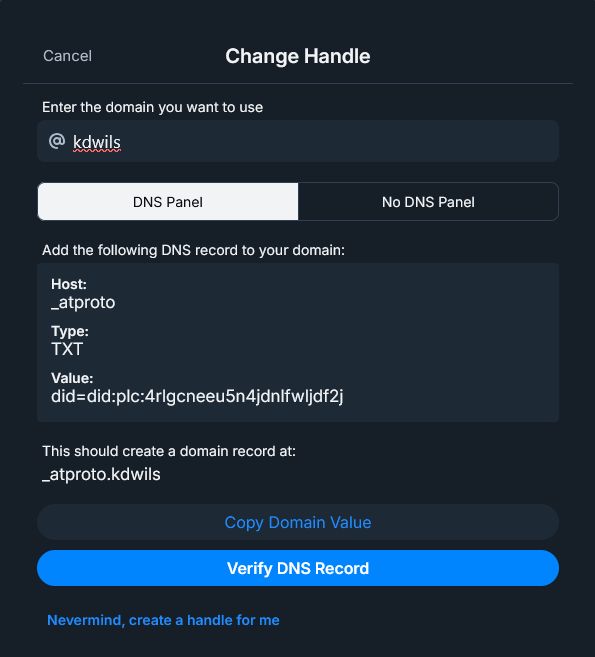
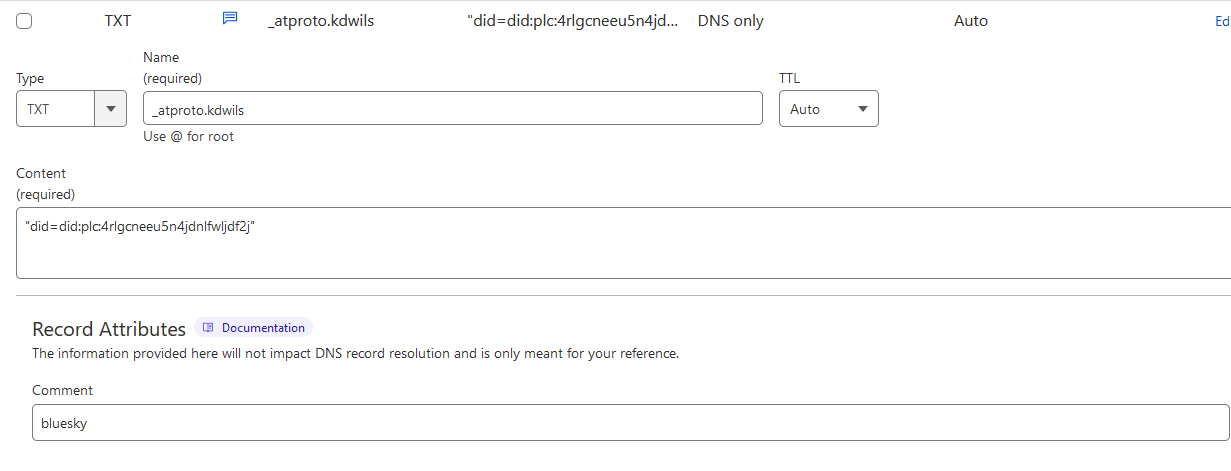
Once you do this, we need to next verify our domain and handle. I did this by creating a TXT record under my domain for bluesky to use.
Navigate to Settings -> Change handle -> I have my own domain on your bluesky account.

Next, in cloudflare, I followed the provided instructions and created a TXT record.

You can verify using this debug tool if needed to ensure you DNS record is working https://bsky-debug.app/handle
And we’re live…

Anyway, here’s a shameless plug: https://bsky.app/profile/kdwils.kyledev.co for a follow. Yell at me here if this doesn’t work for you.