Loadbalancing with metallb for my bare-metal cluster
Now that we have k3s installed and our nodes communicating over the tailnet, we need a way to access the services running in my cluster.
Metallb
MetalLB is a load-balancer implementation for bare-metal Kubernetes clusters, using standard routing protocols.
In short, it allows you to create Kubernetes services of type LoadBalancer in kubernetes clusters that don’t run on a cloud provider, such as bare-metal clusters.
Installing the controller
Head over to the installation docs. I personally chose to install by manifest, which creates a metallb-system namespace for us.
$ kubectl apply -f https://raw.githubusercontent.com/metallb/metallb/v0.13.7/config/manifests/metallb-native.yaml
Metallb runs as a daemonset, creating a pod that runs on each node known as speaker, in addition to a controller. The controller will handle assinging IPs to services, while each speaker will advertise services with assigned IPs using the strategy configured. I currently have 3 nodes in my cluster there are 3 speakers total.
$ kubectl get daemonset -n metallb-system
NAME      DESIRED   CURRENT   READY   UP-TO-DATE   AVAILABLE   NODE SELECTOR            AGE
speaker   3         3         3       3            3           kubernetes.io/os=linux   5h30m

$ kubectl get pods -n metallb-system
NAME                          READY   STATUS    RESTARTS        AGE
controller-84d6d4db45-zvd2d   1/1     Running   0               5h22m
speaker-xmngr                 1/1     Running   0               5h22m
speaker-sqrsq                 1/1     Running   0               5h22m
speaker-gf2cm                 1/1     Running   0               5h22m
Configuration
We need to tell metallb what ip pool it has to pick from. You can use 10.0.1.0/24 syntax here or a range such as 10.0.0.0-10.0.0.100. To do this, we create an IPAddressPool.
apiVersion: metallb.io/v1beta1
kind: IPAddressPool
metadata:
  name: load-balancer
  namespace: metallb-system
spec:
  addresses:
    - 10.0.1.0/24
Next, we tell metallb how we want to advertise our services.
apiVersion: metallb.io/v1beta1
kind: L2Advertisement
metadata:
  name: l2advertisement
  namespace: metallb-system
spec:
  ipAddressPools:
    - load-balancer
Run a kubectl apply to your metallb namespace for your address pool and advertisement configs.
Tailscale
Check out tailscales kb article on subnets and why you want to use them.
I want to access services metallb advertises in my tailnet, which is a good use case for a subnet router.
Subnet Routers
I am advertising the 10.0.1.0/24 CIDR for my subnet router. This means we will be able to access any ip address in that range from devices that are connected to my tailnet, even if we I am not connected to the same local network. This only needs to be done on whichever node you want to use as a subnet router.
NOTE: The ip range that you gave metallb to use need to fall under the CIDR for your subrouter. If you’re unsure, check out https://www.ipaddressguide.com/ to verify your ip range is correct.
We’ll need to choose a machine to act as our subnet router and rerun tailscale up advertising the routes we want to expose to the tailnet.
sudo tailscale up --advertise-routes=10.0.1.0/24
Approving our Subnet Router
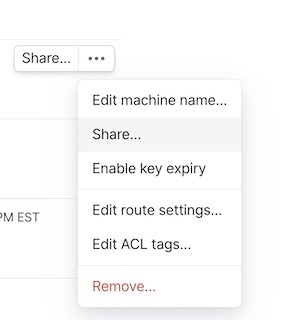
Once you’ve ran some flavor of sudo tailscale up, navigate over to your tailnet admin console.
Lets approve our subnet and disable key expiry. I’ve already disabled key expiry for this particular machine. Subnet routes can be approved under edit route settings.
Approve your subnet route(s)
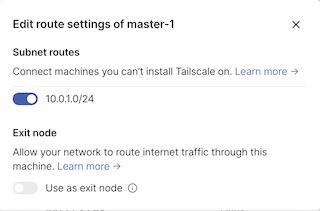
Our subnet router should be ready to use!
Testing out metallb & tailscale subnet router
To test out our new setup, we’re going to deploy pihole to our cluster, have metallb assign it an external ip, and use it to do a dns lookup for google.com.
Pihole
Pi-hole is a general purpose network-wide ad-blocker that protects your network from ads and trackers without requiring any setup on individual devices. You can also use it as a DNS server.
Defining our pihole deployment
Check out these helm charts for setting up your deployment.
Lets create a namespace for pihole to live in.
$ kubectl create namespace pihole
Next, let’s take a look at the services we are going to deploy.
Pihole homelab-pihole-dns-tcp and homelab-pihole-dns-udp will be the services used for dns lookups.
Take note of the annotations on each of these two services. metallb.universe.tf/loadBalancerIPs tells metallb what ip(s) you want to assign to this service. Make sure the IP you assign to the services is within the range you gave metallb in the IPAddressPool.
Because homelab-pihole-dns-tcp listens on TCP and homelab-pihole-dns-udp listens on UDP, these two services can share the same IP address.
The annotation metallb.universe.tf/allow-shared-ip tells metallb to allow this. Each service that will be sharing an IP is required to have the annotation.
PiHole Services YAML
apiVersion: v1
kind: Service
metadata:
  name: homelab-pihole-dns-tcp
  labels:
    app: pihole
  annotations:
    metallb.universe.tf/allow-shared-ip: shared-pihole-dns
    metallb.universe.tf/loadBalancerIPs: 10.0.1.70
spec:
  type: LoadBalancer
  externalTrafficPolicy: Cluster
  ports:
    - port: 53
      targetPort: dns
      protocol: TCP
      name: dns
  selector:
    app: pihole
    release: homelab
---
apiVersion: v1
kind: Service
metadata:
  name: homelab-pihole-dns-udp
  labels:
    app: pihole
  annotations:
    metallb.universe.tf/allow-shared-ip: shared-pihole-dns
    metallb.universe.tf/loadBalancerIPs: 10.0.1.70
spec:
  type: LoadBalancer
  externalTrafficPolicy: Cluster
  ports:
    - port: 53
      targetPort: dns-udp
      protocol: UDP
      name: dns-udp
  selector:
    app: pihole
    release: homelab
---
apiVersion: v1
kind: Service
metadata:
  name: homelab-pihole-web
  labels:
    app: pihole
  annotations:
    metallb.universe.tf/loadBalancerIPs: 10.0.1.71
spec:
  type: LoadBalancer
  externalTrafficPolicy: Cluster
  ports:
    - port: 80
      targetPort: http
      protocol: TCP
      name: http
    - port: 443
      targetPort: https
      protocol: TCP
      name: https
  selector:
    app: pihole
    release: homelab
Here is the full yaml I am using. You can leave out the custom dnsmaq config map and remove the volume from the deployment. We will be covering those in a later post.
Full PiHole Kubernetes YAML
apiVersion: v1
kind: Secret
metadata:
  name: homelab-pihole-password
  labels:
    app: pihole
    chart: pihole-2.11.1
    heritage: Helm
    release: homelab
type: Opaque
data:
  password: "Y2hhbmdlLW1l"
---
apiVersion: v1
kind: ConfigMap
metadata:
  name: homelab-pihole-custom-dnsmasq
  labels:
    app: pihole
    chart: pihole-2.11.1
    release: homelab
    heritage: Helm
data:
  02-custom.conf: |
    addn-hosts=/etc/addn-hosts
  addn-hosts: |
  05-pihole-custom-cname.conf: |
---
apiVersion: v1
kind: Service
metadata:
  name: homelab-pihole-dns-tcp
  labels:
    app: pihole
    chart: pihole-2.11.1
    release: homelab
    heritage: Helm
  annotations:
    metallb.universe.tf/allow-shared-ip: shared-dns
    metallb.universe.tf/loadBalancerIPs: 10.0.1.70
spec:
  type: LoadBalancer
  externalTrafficPolicy: Cluster
  ports:
    - port: 53
      targetPort: dns
      protocol: TCP
      name: dns
  selector:
    app: pihole
    release: homelab
---
apiVersion: v1
kind: Service
metadata:
  name: homelab-pihole-dns-udp
  labels:
    app: pihole
    chart: pihole-2.11.1
    release: homelab
    heritage: Helm
  annotations:
    metallb.universe.tf/allow-shared-ip: shared-dns
    metallb.universe.tf/loadBalancerIPs: 10.0.1.70
spec:
  type: LoadBalancer
  externalTrafficPolicy: Cluster
  ports:
    - port: 53
      targetPort: dns-udp
      protocol: UDP
      name: dns-udp
  selector:
    app: pihole
    release: homelab
---
apiVersion: v1
kind: Service
metadata:
  name: homelab-pihole-web
  labels:
    app: pihole
    chart: pihole-2.11.1
    release: homelab
    heritage: Helm
  annotations:
    metallb.universe.tf/loadBalancerIPs: 10.0.1.71
spec:
  type: LoadBalancer
  externalTrafficPolicy: Cluster
  ports:
    - port: 80
      targetPort: http
      protocol: TCP
      name: http
    - port: 443
      targetPort: https
      protocol: TCP
      name: https
  selector:
    app: pihole
    release: homelab
---
apiVersion: apps/v1
kind: Deployment
metadata:
  name: homelab-pihole
  labels:
    app: pihole
    chart: pihole-2.11.1
    release: homelab
    heritage: Helm
spec:
  replicas: 1
  strategy:
    type: RollingUpdate
    rollingUpdate:
      maxSurge: 1
      maxUnavailable: 1
  selector:
    matchLabels:
      app: pihole
      release: homelab
  template:
    metadata:
      annotations:
        checksum.config.adlists: 01ba4719c80b6fe911b091a7c05124b64eeece964e09c058ef8f9805daca546
        checksum.config.blacklist: 01ba4719c80b6fe911b091a7c05124b64eeece964e09c058ef8f9805daca546
        checksum.config.regex: 01ba4719c80b6fe911b091a7c05124b64eeece964e09c058ef8f9805daca546
        checksum.config.whitelist: 01ba4719c80b6fe911b091a7c05124b64eeece964e09c058ef8f9805daca546
        checksum.config.dnsmasqConfig: 622ac6ff4c980b4443e393f5251d8190a29a0c471c3f1ddeeebaaee554fbf67
        checksum.config.staticDhcpConfig: 01ba4719c80b6fe911b091a7c05124b64eeece964e09c058ef8f9805daca546
      labels:
        app: pihole
        release: homelab
    spec:
      dnsPolicy: None
      dnsConfig:
        nameservers:
        - 1.1.1.1
        - 8.8.8.8
      hostname:
      hostNetwork: false
      containers:
        - name: pihole
          env:
          - name: 'WEB_PORT'
            value: "80"
          - name: VIRTUAL_HOST
            value: pi.hole
          - name: WEBPASSWORD
            valueFrom:
              secretKeyRef:
                key: password
                name: homelab-pihole-password
          - name: 'PIHOLE_DNS_'
            value: '1.1.1.1;8.8.8.8'
          image: "pihole/pihole:2023.01"
          imagePullPolicy: IfNotPresent
          securityContext:
            privileged: false
          ports:
          - containerPort: 80
            name: http
            protocol: TCP
          - containerPort: 53
            name: dns
            protocol: TCP
          - containerPort: 53
            name: dns-udp
            protocol: UDP
          - containerPort:  443
            name: https
            protocol: TCP
          - containerPort: 67
            name: client-udp
            protocol: UDP
          livenessProbe:
            httpGet:
              path: /admin/index.php
              port: http
              scheme: HTTP
            initialDelaySeconds: 60
            failureThreshold: 10
            timeoutSeconds: 5
          readinessProbe:
            httpGet:
              path: /admin/index.php
              port: http
              scheme: HTTP
            initialDelaySeconds: 60
            failureThreshold: 3
            timeoutSeconds: 5
          volumeMounts:
          - mountPath: /etc/pihole
            name: config
          - mountPath: /etc/dnsmasq.d/02-custom.conf
            name: custom-dnsmasq
            subPath: 02-custom.conf
          - mountPath: /etc/addn-hosts
            name: custom-dnsmasq
            subPath: addn-hosts
          - mountPath: /etc/dnsmasq.d/05-pihole-custom-cname.conf
            name: custom-dnsmasq
            subPath: 05-pihole-custom-cname.conf
          resources:
            {}
      volumes:
      - name: config
        persistentVolumeClaim:
          claimName: pihole
      - configMap:
          defaultMode: 420
          name: homelab-pihole-custom-dnsmasq
        name: custom-dnsmasq
You can check that your services got created. Note the external-ips that got assigned to our services. The dns services should be sharing whatever ip you gave them, and the pihole-web service should have its own ip.
$ kubectl get svc -n pihole
NAME                     TYPE           CLUSTER-IP      EXTERNAL-IP   PORT(S)                      AGE
homelab-pihole-dns-tcp   LoadBalancer   10.43.75.7      10.0.1.70     53:32441/TCP                 20h
homelab-pihole-dns-udp   LoadBalancer   10.43.242.253   10.0.1.70     53:30206/UDP                 20h
homelab-pihole-web       LoadBalancer   10.43.123.96    10.0.1.71     80:31059/TCP,443:31284/TCP   20h
And the pihole pod running
$ kubectl get pods -n pihole
NAME                             READY   STATUS    RESTARTS   AGE
homelab-pihole-989bd4c59-k9gd7   1/1     Running   0          19h
Validation
From my local laptop that is connected to the tailnet, I should be able to use the dns services to lookup domain names. We can use dig to test this out. If you’re on windows, you can use nslookup instead.
$ dig @10.0.1.70 google.com

; <<>> DiG 9.10.6 <<>> @10.0.1.70 google.com
; (1 server found)
;; global options: +cmd
;; Got answer:
;; ->>HEADER<<- opcode: QUERY, status: NOERROR, id: 17033
;; flags: qr rd ra; QUERY: 1, ANSWER: 6, AUTHORITY: 0, ADDITIONAL: 1

;; OPT PSEUDOSECTION:
; EDNS: version: 0, flags:; udp: 1232
;; QUESTION SECTION:
;google.com.			IN	A

;; ANSWER SECTION:
google.com.		150	IN	A	142.250.123.101
google.com.		150	IN	A	142.250.123.100
google.com.		150	IN	A	142.250.123.138
google.com.		150	IN	A	142.250.123.102
google.com.		150	IN	A	142.250.123.139
google.com.		150	IN	A	142.250.123.113

;; Query time: 35 msec
;; SERVER: 10.0.1.70#53(10.0.1.70)
;; WHEN: Thu Feb 16 10:51:32 EST 2023
;; MSG SIZE  rcvd: 135
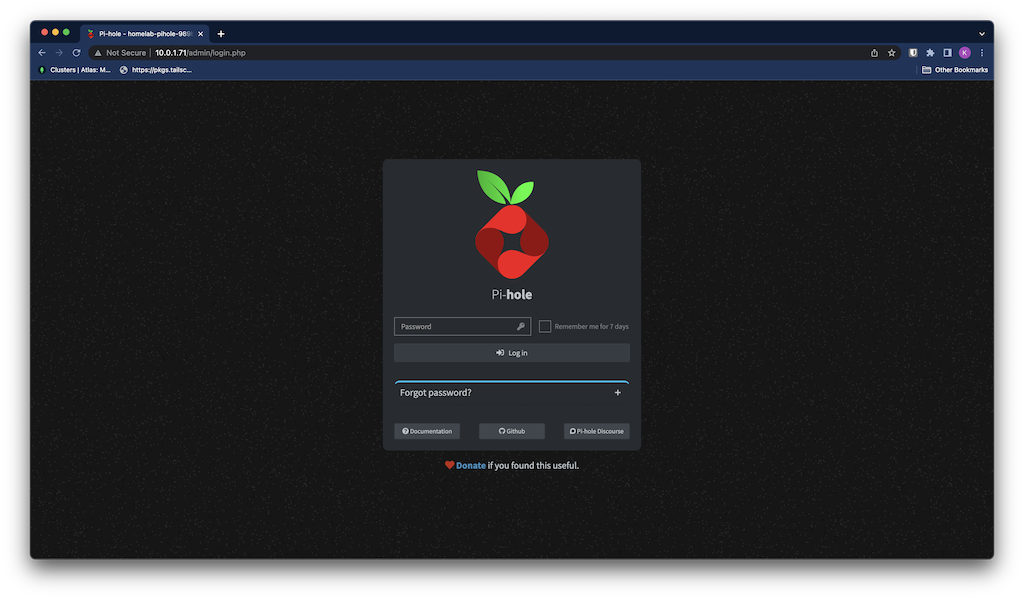
You can also navigate to the pihole dashboard from your browser
Tailnet wide ad blocking
If you’re interesting in getting ad blocking for any device connected to your tailnet via PiHole, you can configure tailscale to use your cluster pihole deployment.
Navigate over to the DNS page in your tailnet and add a custom nameserver. We’ll want to add the external-ip metallb assigned to the pihole services.
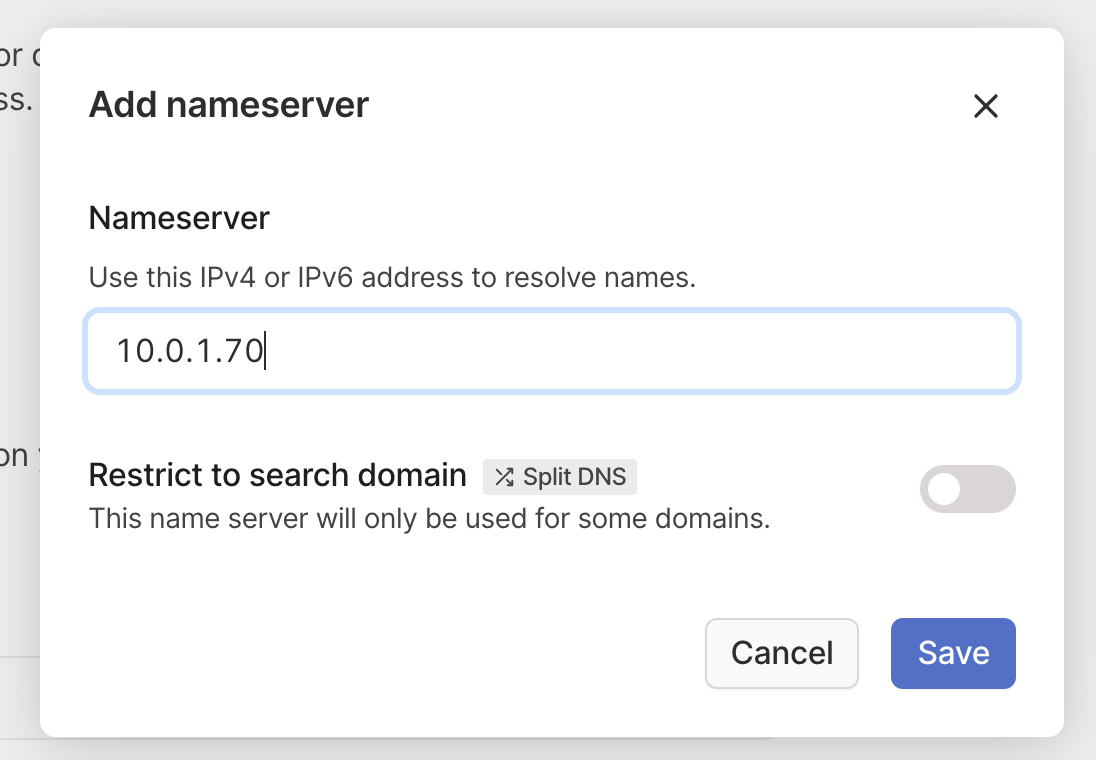
Enable local DNS override.

Now any device on your tailnet gets the benefit of pihole adblocking while connected.
NOTE: If your pihole services are down you are going to run into trouble with DNS lookups. You may want to consider a backup here or make sure your pihole services are highly available.